Okay, so to help me get into the mood for this pair-friendly holiday (going it single as usual), I decided to do a Valentines day table! I figured maybe it would cheer me up a bit, and i could pretend I actually enjoy this holiday.....

And here is another overall shot from the side. ( I forgot to take the plastic wrap off of the candies before I took the picture. We live in an apartment, and sometimes get ants, so food always gets covered.)

Pretty much everything that you see on this table is actually from the dollar store. I could live in dollarama and be content for the rest of my life. I picked up some nice clear jars ( I figure as they are clear I can reuse them with different results) in different shapes. As you can see in the next picture I chose white mints. I will show you how to make a rose tree a little later on this post.

Swedish Berries make a lovely red candy, and notice the pink and green watermelons? Robbie recommended those..... and I buried them under the red to keep with the theme of course.

I bought a nice red candle (smells so nice!) and filled the jar with some white craft sand too.

And I know that these are actually tea towels but they look so cute as napkins!!

So on to the rose tree!! I simply love the way this turned out! so simple, easy, and I only spend $3.25 making it!

Okay so to make one you will need:

- Candle stick (mine is from dollarama for $1.25)
- Red tissue paper (or any color of your choice $1)
- Tape
- Scissors
- Tooth Picks
- Foam ball ($1 for 6 at dollarama!)

So i cut three pieces of tissue paper in to 6 inch strips. You may need more or less depending on how big your foam ball is.

Crumple one piece in your hand. It gives it a nice natural look.

Lay it out and fold the piece in half length-wise. Notice that my craft space is my couch? Oh the joys of living in a small apartment!!

Now start at one end and begin to roll the tissue paper

As I roll I like to twist the tissue paper outwards. Don't worry if your first few roses don't look right, after a few of them you really start to get the hang of it!

And roll some more...

When you have rolled the whole strip twist the bottom of it to keep it together.

Throw some tape on that sucker!!

I hear you can glue your roses on but I find that sticking a toothpick in the roses and then in the foam is much easier. Although I do suggest that you really tape the rose TO the tooth pick.... trust me it will save you from a headache later!! Now repeat, and repeat, and well you get the idea..... make a bunch. If its not enough you can always make more!!

Next I placed the foam ball on the candle stick and traced around it. This made it so much easier to place on the candle stick later. I did it like this so I can change what is on the candle stick in the future instead of gluing the roses right to it.

Now start sticking!
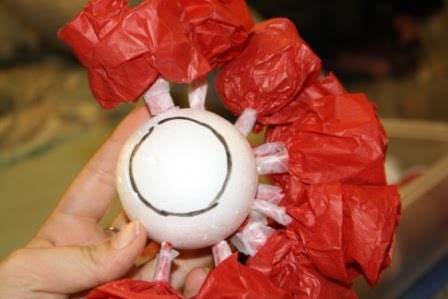
And poke some more....

And go until you have covered all but the circle you drew earlier! Now you are ready to place on you candle stick. You now have your very own rose tree!!
Enjoy!
No comments:
Post a Comment